5 Tips To Organizing (And Beautifying) Your Kitchen
Written by Katie Hintz-Zambrano & Wiebke Liu
Photography by Photographed by Maria Del Rio for Blisshaus
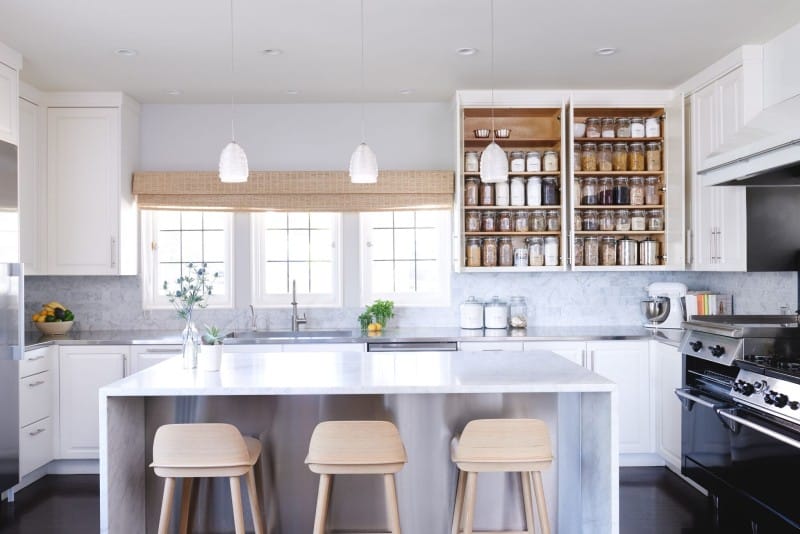
Ah, the kitchen. For so many of us, it truly is the heart of our homes. However, we bet just a few tweaks to your space could make it 10 times better. How so? We asked mother-of-two Wiebke Liu, the mastermind behind the sustainable home organization company Blisshaus to fill us in. “Chances are, when you moved into your kitchen you didn’t even have the time to think about how to best organize it,” says Liu, whose ultimate goal is pretty, purposeful, near plastic-free households. “There were just too many boxes to unload, too many rooms to sort out. So, in went the plates and cups and pots and food things. Since then, you simply got used to where stuff is and haven’t given a second thought to whether the pots should stay in the pull-out drawers by the stove or maybe could find a better home somewhere else.” If this sounds familiar (we know we’re nodding our heads), read Liu’s 5 simple tips to organizing your kitchen like a total pro.
1. Use your dishwasher as a workflow anchor.
“One of the most frequent activities in the kitchen is loading and unloading the dishwasher. So, for optimal workflow, use the dishwasher as your anchor. Imagine you are about to unload your dishwasher. Then designate cabinets and drawers to hold your dishes and silverware based on where you are standing. Where are your glasses and plates and silverware going? The best spot for glasses is a cabinet right above the dishwasher. Place plates in drawers or cabinets under the counter right next to the dishwasher. If you don’t have space right there, locate glasses and mugs and plates so you pivot at most 90 degrees to reach their homes. Ideally, you don’t have to take a single step to put everything away. The only exception are knives, pots, and other frequently used cooking utensils that must be stored right next to the stove.”
2. Store plates and bowls in under-counter cabinets.
“It is very typical for folks to stack plates in an overhead cabinet. We don’t know when that all too common practice started, but we highly recommend storing your plates down low, under the counter. A deep drawer next to the dishwasher is ideal, but a cabinet will do, too. This way, you won’t have to lift heavy stacks of plates by reaching up. And best of all, now your kids can reach the plates safely and will be able to set your table before they can spell their own name! We are big proponents of letting kids carry even porcelain plates to the table. Afterall, you let them hold your smartphone or tablet, why not trust them with a plate?”
3. Designate a drawer for spices.
“Spices in cabinets have the persistent tendency to get cluttered and messy. No matter what fancy stacking trays or lazy susans you invest in. Where should they live? In a drawer! We’re willing to bet there is a drawer that can be decluttered and become your spice nirvana. Just lay spice jars from the grocery store flat. Or, if you’re like us—a perfectionist and style addict—try these gorgeous spice tins from Blisshaus. They hold a jar’s worth, make it easy to get a pinch or tablespoon or more out, and are easily refilled.”
4. Lay water bottles and travel mugs flat.
“Is your collection of water bottles and reusable travel mugs constantly tipping over on your shelf? Solve this problem by laying them flat in a drawer. If you have too many, select the best matching ones for style points and donate the rest to Goodwill or your kids’ sports coach (there’s always a kid who forgot their bottle at home and now the coach can come to the rescue). We find that we don’t need more than 2 bottles/mugs per family member. This is truly a case of less-is-more. If you don’t have a drawer to spare, lay the bottles flat in a basket on a low shelf that your kids can reach.”
5. Create a ‘Pack-Your-Snack’ station.
“Packing school or work snacks can be a real chore. First you dig out your container. Then you walk over to the pantry for your crackers, etc. Then you look in yet another place for your water bottle. Before you know it, you’ve crossed the kitchen several times and the schoolbus is about to leave. Make packing the snacks a cinch by creating a snack station where all the tools you need are right there in one place. First, find a spot where you can designate 3 drawers/shelves for your water bottles, snack tins, and snack jars. If your kids are gradeschool age, be sure to designate lower drawers or shelves so they can easily reach them. The first drawer holds all your water bottles. The next one holds all your lunch tins and sandwich bags. And the last drawer or shelf is for your jars of snack foods. Kids love creating their own trail mixes. So, stock your jars with nuts, raisins, dried cranberries, pretzels, cheesy crackers, and, of course, a jar of chocolate chips (hey, it’s called Blisshaus for a reason!). All of these are pretty easy to find in the bulk bin section. For super busy days, stock a jar with granola bars, cookies, and maybe some jerky. (Check out Blisshaus’ homemade Granola bars and Fruit Rollups recipes that take only 10 minutes prep time.) With your ‘Pack-your-Snack’ station in place, you now can ask your kids to get their school snack ready themselves. They’ll have fun mixing their own signature snacks and you can finish that morning cup of coffee.”
For more on Blisshaus products and services, head over here.
Share this story