4 Beautiful Nature Crafts For Kids You’ll Want To Make ASAP
Written by Erin Feher
Photography by Photography from WILD AND FREE HANDCRAFTS by Ainsley Arment, reprinted with permission by HarperOne
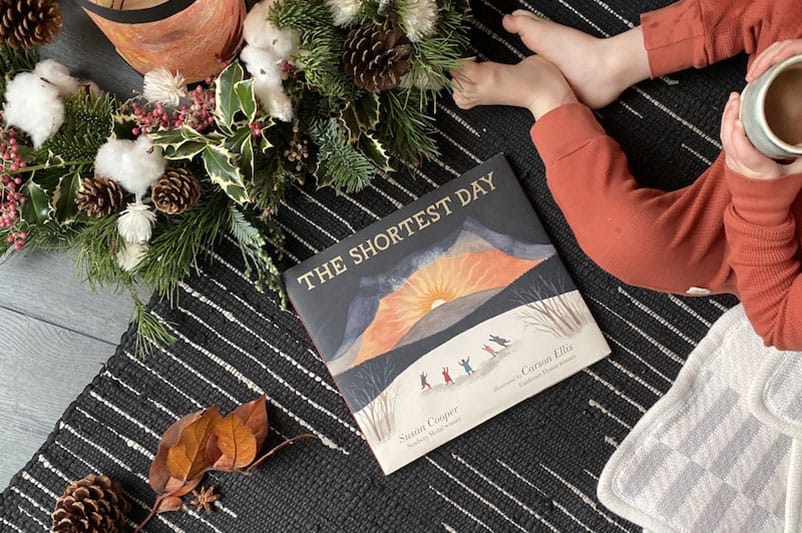
Forgot to stock up on construction paper and pipe cleaners while you were frantically filling the shopping cart last? Not to worry, these gorgeous nature crafts for kids require materials that are abundant and free for the taking for anyone who can still sneak out for a little nature walk. Ainsley Arment is the founder of Wild and Free, an online community of creative mothers and homeschoolers who have been sharing tips and inspiration on fostering the adventure, freedom, and wonder of childhood for years. Ainsley’s latest book is Wild And Free Handcrafts, and features 32 gorgeous craft projects, organized by season, that make magic out of all those sticks, rocks, shells, and feathers that seem to populate every young child’s jacket pocket. The book comes out today, March 24, and there seems no better time that the present to take an extra moment to appreciate Mother Nature’s bounty and to get working with your hands. Ainsley has shared 4 of her favorite crafts with us here, from a whimsical fairytale tree house to the prettiest spring suncatchers. Click through the slideshow below for full project instructions and get crafting!
Want to win your very own copy of Wild And Free Handcrafts? Head over to our Instagram page and follow the easy steps. We will be giving away 5 copies of the book this week!
-
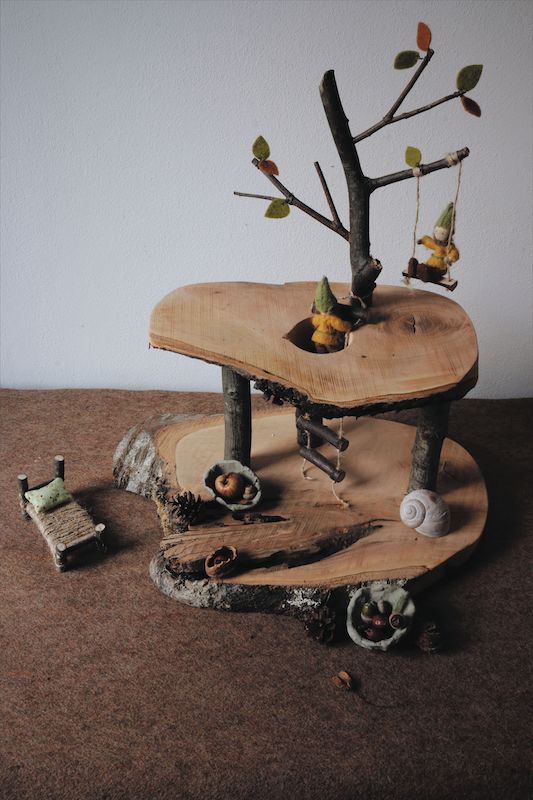
- I love to watch my boys get lost in hours of unstructured, imaginary play. They get wrapped up in a story plot that unfolds like their own private fairy tale built with experiences and stories from the world that surrounds them. They jump down the rabbit hole (or squirrel den) and wander into a wild and beautiful world where their dreams come true and their fears become dragons that need to be tamed. It is here that they come to transform what they have seen and heard into something that is their own. It is here that they learn and grow. We often turn to crafts to create something that can play a role in these adventures: a wooden dragon for Michaelmas, a new set of felt gnomes, and, of course, this whimsical tree house.
-
-
*2 large slices of wood (one should be slightly smaller than the other with a hole approximately 2 inches across for the ladder); the slices can be natural wood, even with the bark still attached (we used wood from a cherry tree we had to cut down two winters ago, but any soft wood, such as linden or beech, would work as well); the thickness of the slice isn’t important as long as you can cut through it
*240-grit sandpaper
*3 or 4 chubby sticks with a length of 5 1/2 inches
*1 branch that can be turned into a little tree
*1 straight branch, about 1-to-2 feet long, to cut into lengths for a rope ladder
*Wood glue
*Hemp string
*Pencil
*Scissors
*Small saw
*7 to 9 wooden pegs for woodwork assembly, or a fine wooden rod to cut up into pegs approximately 1 inch long
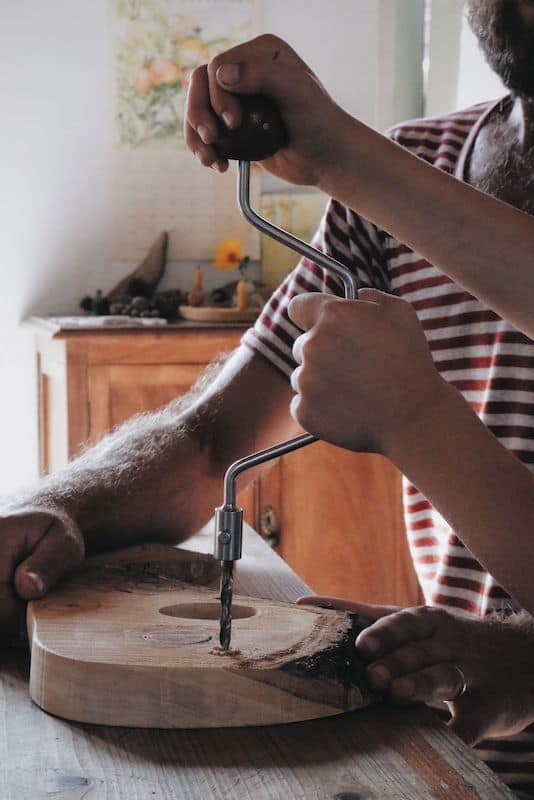
*Drill
*Drill bit to match the pegs
*Fine drill bit to make holes for the rope ladder
*Optional: wool felt for leaves, thin metal wire
Safety Tip: Saws, drills, and wire can be dangerous and should be used with adult supervision.
-
-
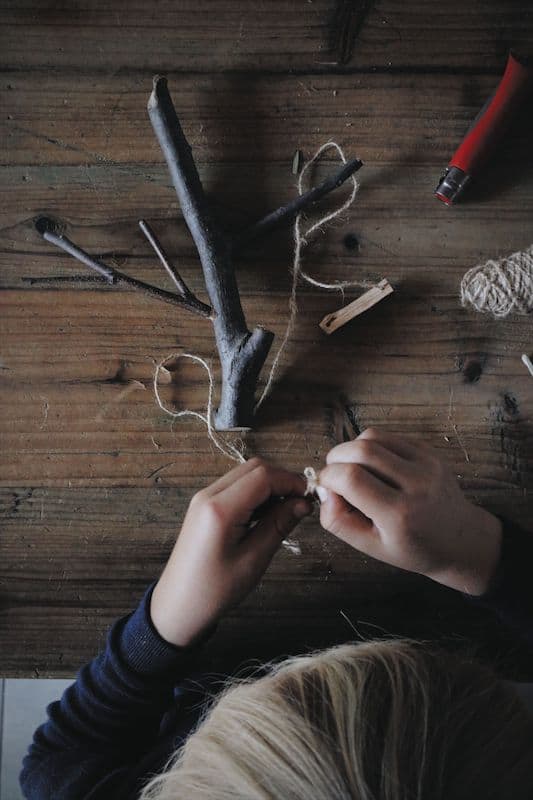
1. Sand the wood slices until they’re perfectly smooth. (Make sure the inside of the ladder hole is sanded as well.)
2. Make sure the chubby sticks are all exactly the same length; trim as needed. Position them on the larger wood slice, which will be the ground floor. Place the smaller slice on top of these stick pillars to test the composition.
3. Once you’re satisfied with the composition of the tree house, draw around the pillar sticks with a pencil to mark their placement on the bottom board and on the underside of the top board.
4. Drill holes in the center of your marks and in both ends of the sticks.
5. Apply glue to the pegs and insert them into the holes to assemble the tree house.
6. Drill a small hole in the bottom of the branch that will become your tree and drill a hole in the board where you want the tree to be. Apply some glue to a peg and insert it into the branch. Dip the other side of the peg in glue and “plant” your tree.
The basic structure of the tree house is now ready. The next step is to make the rope ladder.
-
-
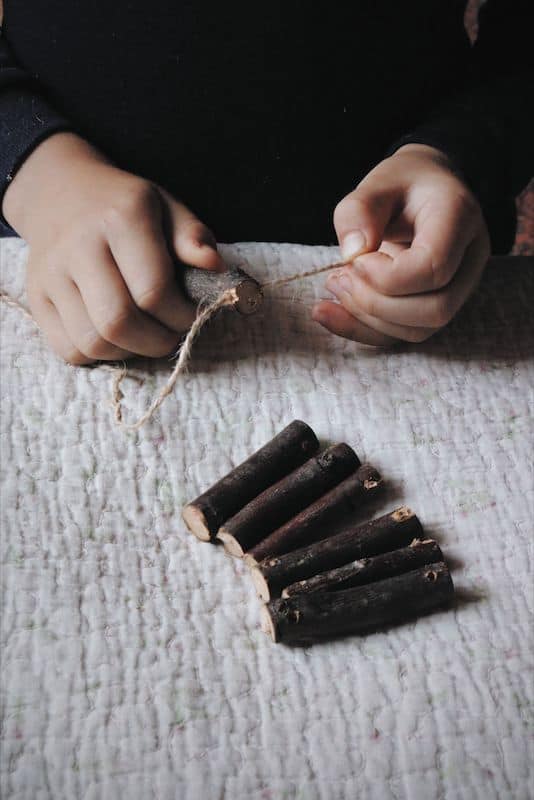
1. Cut the straight branch into 7 to 10 short sticks of about 2 inches each.
2. Drill tiny holes through both ends of the sticks, making sure the holes are aligned.
3. Cut 2 lengths of string and tie a triple knot at the beginning of both strings.
4. Thread the strings through the tiny holes in one stick and slide them through so the stick comes to rest on the knots. Make 2 more knots at approximately 1 inch from the first ones.
5. Thread the strings through the next stick and repeat the steps until the rope ladder is the desired length. Use the ends of the strings to tie the ladder to the base of the tree.
6. If you like, you can use this same technique to make a small swing.
7. Lastly, you can attach felt leaves to the tree branch by attaching a felt leaf to both ends of a small piece of wire. Bend the wire back, twist it a few times onto itself to secure the leaves in place, and wrap the wire around a branch of the tree.
-
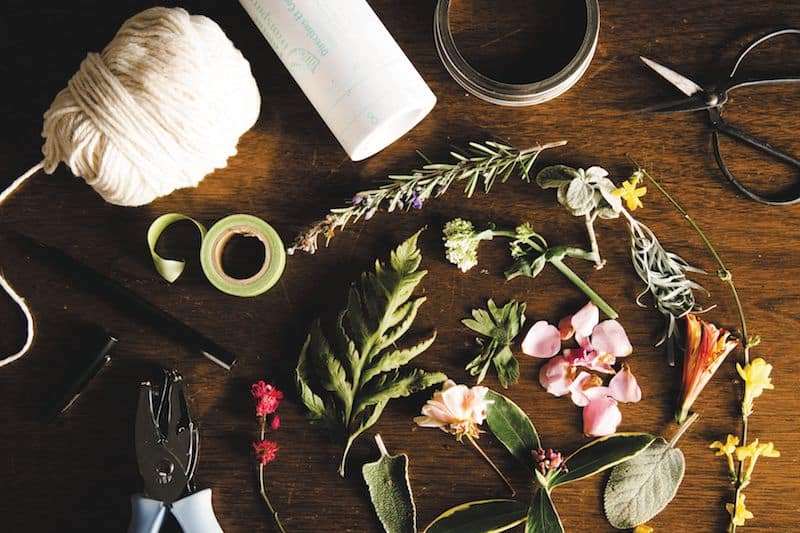
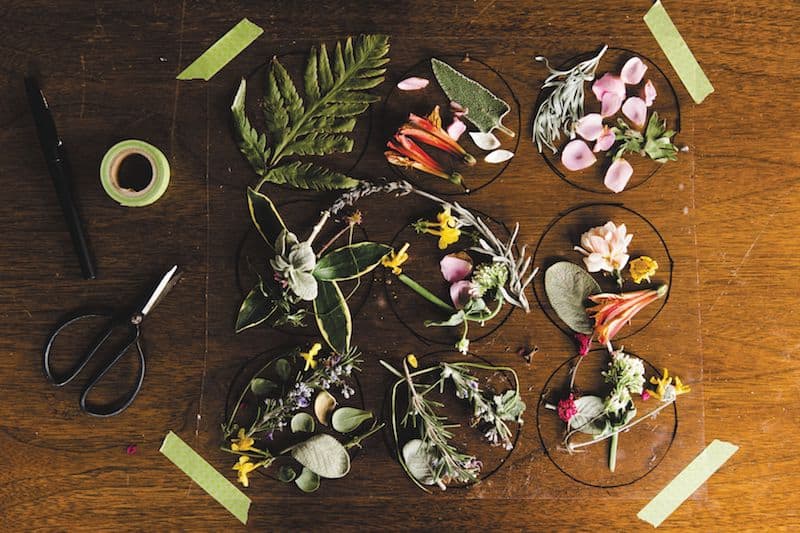
- The arboretum at our local university has become a special spot where my children and I enjoy observing flowers and trees through the seasons. Admission is free, and there are no rules against respectfully gathering a few specimens to take home. We have been able to learn the names of many native plants, thanks to the identification labels and exhibits around the gardens. The green meadows, sturdy climbing trees, and picnic tables invite us to linger out of doors for the afternoon. I’ve found that a loosely structured game or task can direct our attention and help our powers of observation come to life. An activity that has often helped us ease our way into the habit of observing and enjoying the outdoors is a nature hunt. We do them year-round, strolling the sidewalks of our neighborhood, ambling along garden paths, or hiking in the foothills near our home. We usually take along a basket for our treasures (though on spontaneous outings, it’s my stroller basket). Sometimes I ask my children for specific objects to bring back, while other times I guide them by giving them features to look for in the landscape, such as a color, texture, or size. Which plants are prickly? Can you find something with soft leaves? Is that cactus taller than you are? After a few questions like these, they are soon off exploring on their own. When our basket is full and the environment has been thoroughly inspected, our time of discovery usually gives way to free play. On one particularly beautiful spring day, we chose to do our nature hunt in a Mediterranean garden, a local exhibit known for its medicinal and culinary herbs. While some of the plants lay dormant for the season, others continued blooming in the mild winter climate. After tiny roses, sprigs of lavender, and soft lamb’s ear were gathered, my girls took off toward the oak groves to rush through leaves and climb on the low, hearty branches. Young children take their nature treasures very seriously (I have learned this the hard way), so I’m always on the lookout for new ways to preserve our findings. The colors and textures in our basket presented the perfect opportunity to make springtime suncatchers. This simple but stunning craft can be done with items you probably already have around the house. Or go on a nature hunt of your own to find new treasures to incorporate into your suncatcher!
-
-
*Clear contact paper
*Scissors
*Pen
*Tape
*Large jar lid (for tracing circles)
*Single-hole punch
*String or twine
-
-
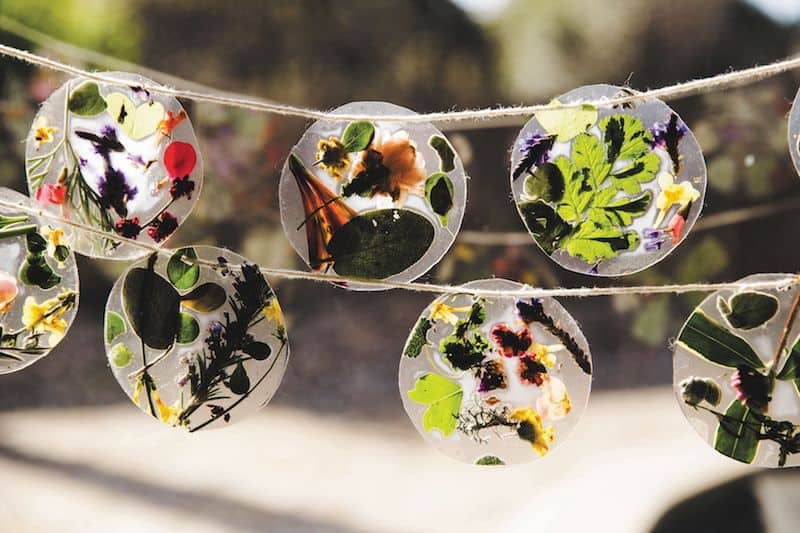
1. Begin by cutting a sheet of contact paper. Tape the corners of the paper to your work surface, clear side up, to prevent the edges from rolling up. Using the jar lid, trace circles onto the contact paper.
2. Untape the contact paper and peel the backing. Flip it over so that the sticky side is now facing up (your traced circles will show through). Retape the corners of the paper to your work surface.
3. Now you have a sticky surface perfect for placing flowers and leaves on. Let your child fill the circles with their treasures. We used everything from twigs to lily blooms, but found that flat, translucent objects looked prettiest in the sun, particularly small leaves, petals, and compressed flowers. Don’t worry about keeping everything in the lines!
4. Cut a second piece of contact paper approximately the same size as the first or larger. Peel the backing and lay it sticky side down on top of your filled circles, so that the nature treasures are sandwiched between the two sheets. Have your child smooth the paper to adhere it securely.
5. Cut out the circles and punch holes in the top of each. If you like, you can place the circles in books overnight to compress them further. String the circles together to make a garland. Hang in a sunny window and enjoy!
-
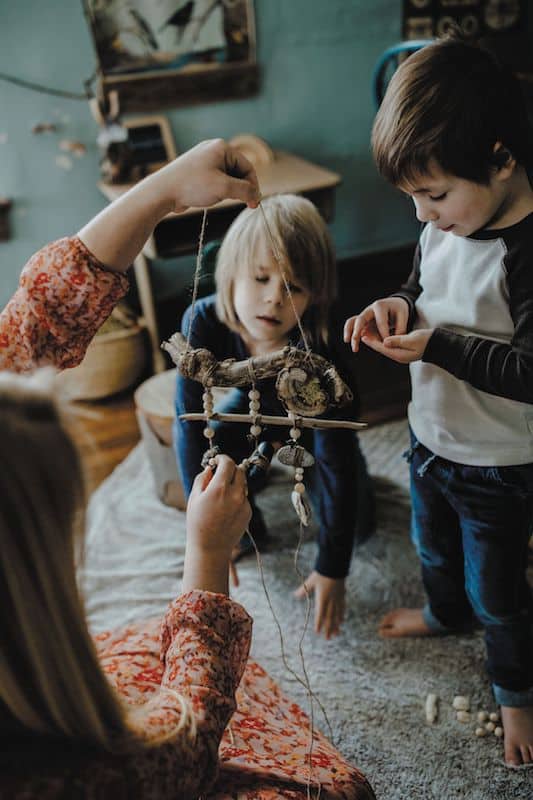
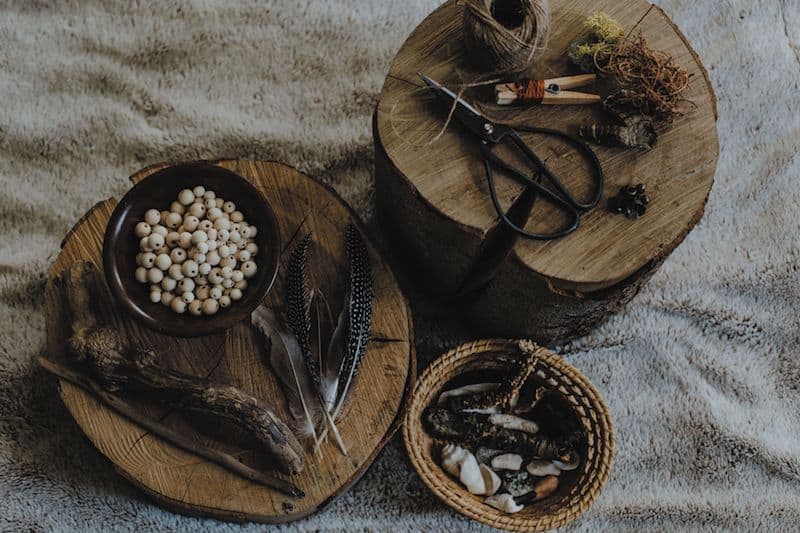
- The winds of my childhood in tropical West Africa always carried a dry dust with the sounds of distant tribal drums, or the loamy smell of wet clay and rotting fruit in the season of rains. Now that I am grown and live in Pennsylvania where the seasons are four instead of two, it excites me to still be discovering the differences that animate the northern cycle. The spring winds here carry mostly the pungent animal smells of the surrounding farmlands. But my boys and I still prefer to be outdoors letting that wind tangle our hair while we stuff our pockets full of natural treasures that were buried so long under winter snow and frozen earth. Seeing my children grow excited over a simple oddshaped stone or lost feather or tuft of moss still stirs that familiar childhood wonder in my heart that thrills to encounter raw and natural beauty. Combining these beautiful gathered trinkets into a wind chime is both an artistic and a functional way to utilize some of our collected items. It can also be a rich trial-and-error exploration of the concepts of balance, weight, and symmetry while celebrating the seasonal music of our lives together.
-
-
*Length or two of sturdy driftwood, a branch, or a piece of salvaged wood; must be strong enough to support the items you plan to hang
*Nature elements (responsibly collected stones, shells, smaller sticks, feathers, etc.)
*Natural wooden beads (have children paint them if they prefer color)
*Small craft bells
*Twine or hardy string
*Scissors
*Optional: hot glue, moss, lichen, or dried fungi for decorating
Safety Tip: Hot glue can be dangerous and should be used with adult supervision.
-

-
1. Tie a strand of twine securely to both ends of your chosen piece of wood as the means for hanging your final piece. We glued moss and dried fungi to the wood for decorative value.
2. Tie pieces of string in even increments along the wood, making sure they will each be long enough to hold your treasures, plus extra length for potential layering around the items without holes. (Any excess can be trimmed at the end.)
3. Begin tying or threading your nature elements securely, from top to bottom, winding and knotting multiple times around heavy or odd-shaped items as necessary.
4. String wooden beads and a few bells between each treasure as you go, to add aesthetic and musical value as well as to help prevent potential tangling. Feathers placed near the bottom will catch the wind and aid in creating movement in your wind chime.
5. Hang your finished wind chime in a window, over a porch, or anywhere that will catch a cheerful summer breeze!
-
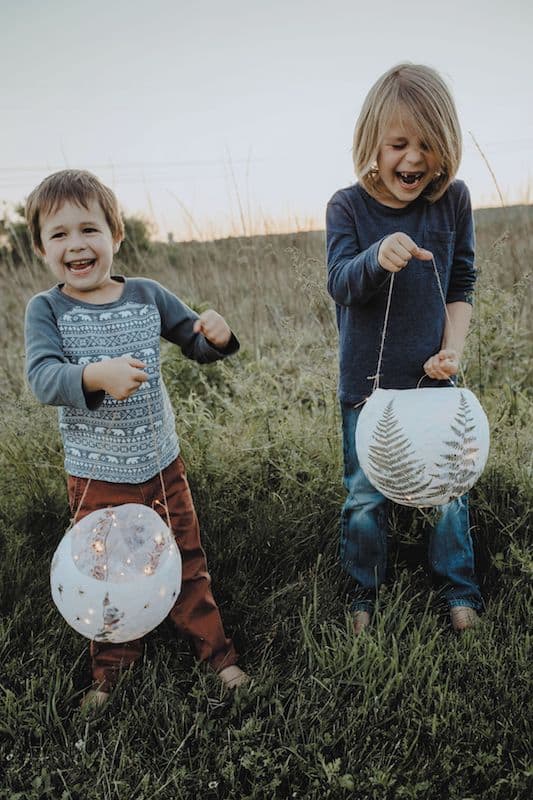
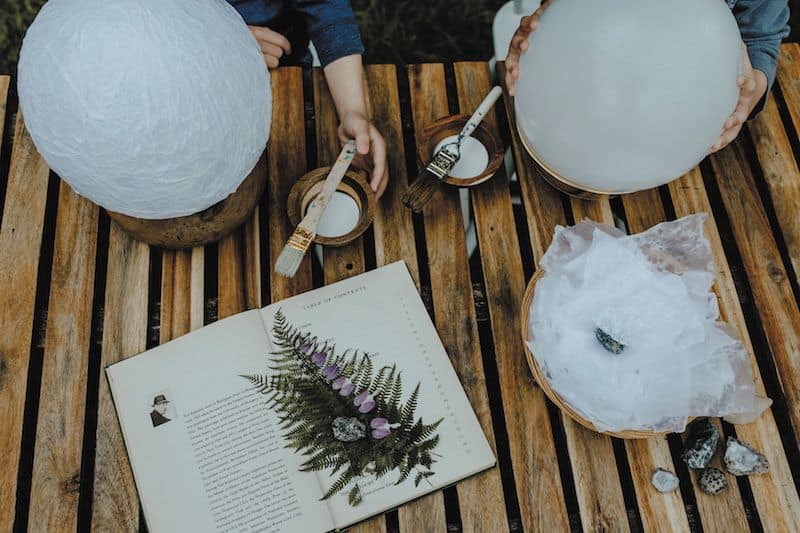
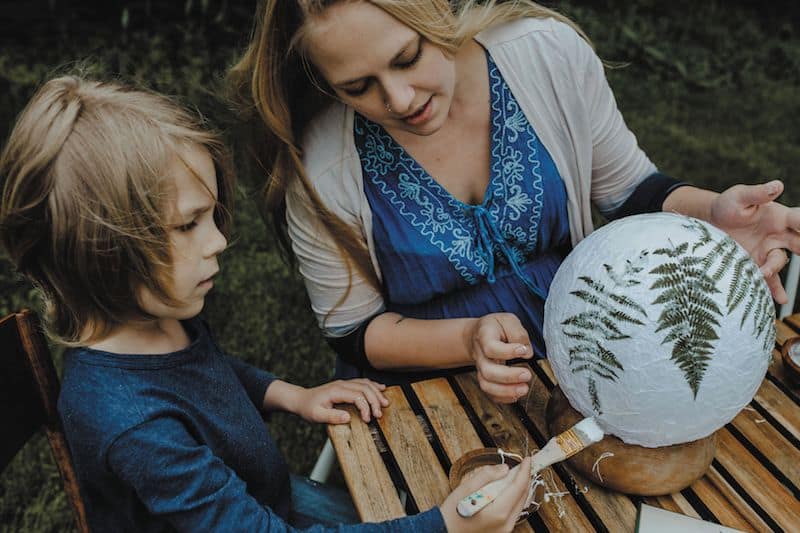
- Summer is such a jubilant celebration of light. It feels as enchanting and simultaneously fleeting as the warm haven of childhood—both such tender seasons of curiosity and delicate dreams. I am heeding the wisdom of ancient mothers who have urged me to cherish this time in all its ordinary beauty and brevity. The moment I first pulled the wriggling bodies of my babies against my chest, I suddenly shouldered the invisible and profound weight of all my fragile hopes and dreams for their futures. It is an honor to witness my children become increasingly more independent in their thoughts and ability to explore the world, yet peering protectively into the future they will someday dwell in is like trying to focus my eyes on the distant edge of a twilight-faded field. Will they value kindness above fortune? Will they do the hard work of standing up for those without a voice? Will they be seekers of truth and notice beauty? Who among us doesn’t dream that our children will be beacons of goodness in a world that sometimes flickers between light and shadow? Nurturing these precious days of togetherness with them is the worthy work of threading together our family values like a string of stars—a gift of steadfast love to illuminate whatever path their young hearts choose to forge. I trust that in many places along the journey of their lives, they will be inspired to light new fires and ideas with the kindling of their unique dreams. But I also hope they will be able to lift up the familiar glow of my wildfire love that was offered with the long-ago dream that they would walk bravely through their world as carriers and sharers of light. This craft of starlight lanterns embodies this wish—and is a fun handcraft to make with your kids. Note: This craft requires a few days for the lantern to dry in the middle of construction, so take that into account when planning your starlight lantern party!
-
-
*Assortment of pressed flowers, ferns, leaves, grasses, etc.
*1 balloon
*2 bowls (one to hold the glue-and-water mixture, one to hold the balloon)
*White washable craft glue
*Water
*Paintbrush
*White tissue paper
*Single-hole punch
*Twine
*Strand of battery-operated twinkle lights
-
-
1. Begin by gathering a collection of flowers, ferns, leaves, or grasses and pressing them in a flower press or between the pages of a heavy book for a week or two.
2. When you are ready to begin constructing the lantern, blow up your balloon to the desired size of your lantern and place it snugly into a bowl with the tied end down.
3. Tear the tissue paper into random shapes and strips. Larger pieces are easier for little hands to work with.
4. Combine about 2/3 cup of glue with 2 tablespoons water in your second bowl. If you run out later, mix another batch.
5. Begin painting the glue mixture onto the balloon and applying tissue paper on top of that in alternating layers, covering the balloon with approximately 4 to 5 layers. Be sure to stop the tissue paper layer an inch or two above the rim of the bowl; any unevenness around this edge can be trimmed off later.
6. While your last layer is still wet, gently drape your pressed nature elements onto the surface in a pattern you enjoy, and then cover the leaves and flowers with one last layer of tissue paper. We found that some of our thicker items attached more easily when we painted a few larger brushfuls of glue over the tissue paper underneath and again on top of the nature elements before covering them with the final pieces of tissue paper. It may look milky to begin with, but it will all dry beautifully translucent and the details will be visible when backlit.
7. Allow the lantern to dry completely, 1 or more days based on the thickness, the number of layers, and the humidity.
8. Once the lantern has fully dried, carefully pop the balloon and remove its pieces. Trim the top edges of your lantern if you desire an even rim.
9. Punch a single hole on either side near the top and tie on a piece of twine.
10. Fill your lantern with a strand of battery-operated twinkle lights and enjoy the beautiful glow under the stars!
For more crafting ideas, be sure to scoop up Wild And Free Handcrafts: 32 Activities to Build Confidence, Creativity, and Skill.
Share this story