4 Waldorf-Inspired Art Activities for All Ages
Written by Sara Langer
Photography by Photo Courtesy of How We Montessori
If you’re looking for easy, yet engaging, arts and crafts for your littles of any age, Waldorf-inspired activities are a great way to go. When it comes to creative expression, the Waldorf philosophy believes the materials and method should be simple so the child’s imagination and creativity can flourish without the distraction of complex steps, instructions, and guidelines. Using natural fibers and products, such as beeswax, yarn, burlap, and non-toxic paints or dyes, are the foundation for most projects. The activities we’re sharing with you below are simple enough for your preschooler, but can easily become more intricate and engaging for older children, as well. Check out our step-by-step instructions for four versatile Waldorf-inspired art activities and have at it!
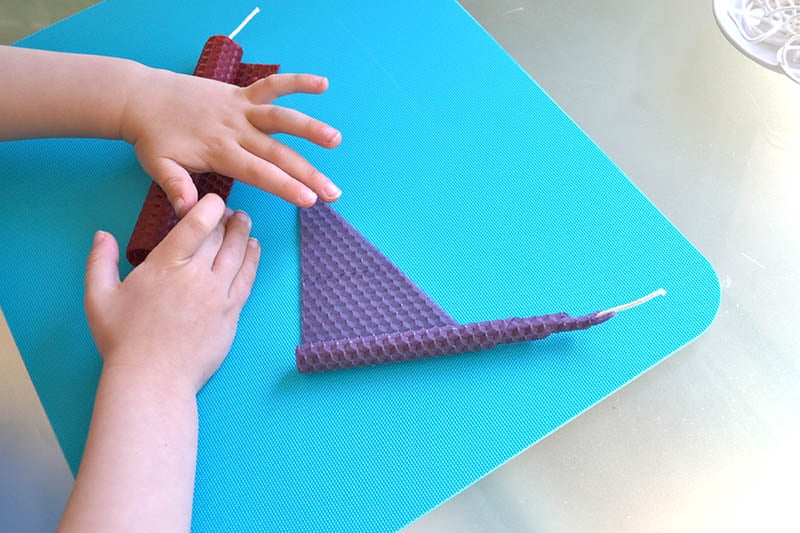
Beeswax Candles
Supplies: Beeswax sheets in a variety of colors, wicking, scissors. You can purchase the sheets and wicking separately or there are kits that will sell them together.
Instructions: Start by laying the beeswax sheet flat on a hard surface. Measure a piece of wicking so it is about 1 inch longer than the beeswax sheet. Lay the wicking down 1/4 inch away from the left edge of the sheet. Leave about 3/4 inch of wicking at the top, where you will eventually light the candle, and about 1/4 inch at the bottom. Fold the 1/4 inch of beeswax left on the edge of the sheet over the wicking, pressing firmly to ensure the wicking is secure. Once the wicking is in place, begin slowly rolling, maintaining gentle pressure. You want to make sure the beeswax is sticking together without smudging the honeycomb pattern on the sheets. Once the candle is rolled up, press the edges in firmly. Try layering sheets or cutting designs into one sheet and laying it on to another to give your candle more detail. Added bonus: These make great gifts for the holidays!
Burlap Embroidery
Supplies: Burlap, yarn needle, embroidery hoop (optional), embroidery thread or yarn, marker (optional).
Instructions: Use a piece of burlap large enough to hang over the edge of the embroidery hoop (if you are using one) by several inches. Cut a piece of thread about 25-30 inches long (much longer and you risk tangling the thread more easily). Thread the needle, bringing both ends of the thread together and tie a knot. A pattern can be drawn onto the burlap before sewing begins or your child can make a freestyle design. Once your child is done sewing, you can glue the burlap onto a piece of construction paper or card stock, making sure you only use glue around the edges of the burlap. Then the work of art can be framed!
Wet-on-Wet Watercolor
Supplies: Watercolor paper (this thick paper is necessary as it will be saturated with water), concentrated watercolor paint in primary colors, 3 small jars or bowls, paint brush, sponges, baking dish filled with water, painting board (a cutting board will work well, too).
Instructions: Start by preparing the watercolor paint by mixing a small amount of the concentrate with water. Using jars makes it easy to mix the concentrate and water thoroughly by putting on the lid and shaking vigorously for a few seconds. Fill the baking dish with water. Have the painting boards ready on a flat surface. You may want to lay a towel or a tarp underneath for easier clean up. Dip the paper in the water, making sure it becomes completely saturated. Lay the paper on the board, using the sponge to smooth out the paper and remove any bubbles. Then, paint away! Using just one or two colors is great for younger artists and will allow them to explore the basis of color theory (when you mix this color and another color, you get…). Older children can use as many colors as they like, telling a story with their images, painting a landscape, or creating something more abstract.
Cardboard Loom Weaving
Supplies: Cardboard, various colors and textures of yarn, tape, scissors, yarn needle, ruler.
Instructions: Cut your cardboard into the desired sized square or rectangle. Use your ruler to draw a line, half an inch away from each edge of the cardboard. Decide where the bottom and the top of the loom will be, then draw in where you’ll make your slits, making each slit 1/2 inch long and 1/4 inch apart (you can space them more widely apart for younger children using thicker yarn). Use the scissors to cut the slits (the slits are where you’ll secure your yarn while weaving—take a look at this visual for reference). String the loom, preferably using a finer, thinner type of yarn. Embroidery thread would work well, too. Thread the yarn into the first slit on the upper left side of the loom. Leave a “tail” of yarn a few inches on the back side of the loom. Tape this to the back of the loom. Carry the thread down to the bottom left slit on the loom and pull it through that slit. Pull the yarn around the back of the loom and up and over the top, securing it in the slit second to the left. Continue doing this all the way across the loom. Thread your needle by tying one end of the yarn to the eye of the needle. Begin weaving, going under and over the strings of the loom, from left to right, leaving about 4-5 inches of yarn on the left. Continue weaving back and forth, left to right, then right to left. Making sure you finish on the right side of the loom, again leaving about 4-5 inches of yarn on the right. Every now and then gently push the woven yarn toward the top of the loom. Choose another color, this time starting on the right side of the loom and ending on the left. You will start with about 4-5 inches of yarn on the right. You will tie this piece of yarn to the end of the first piece of yarn you used. Continue to alternate colors, securing them together as you go. When you are finished weaving, cut the strings on the backside of the loom and pull the weaving away from the cardboard. You may need to gently nudge some of the strings out of the slits. Tie the first two pieces of yarn on the top left together. Repeat with the next two strings and so on until all pieces of string have been secured to a “buddy.” Repeat on the bottom of the weaving. You can trim the strings completely away or leave some as fringe on either end of the loom.
For more Waldorf-inspired activities, check out these creative things to do at home with your preschooler.
Share this story